Azure API Management Analytics Integration
Preview feature
This feature is currently in preview and you may experience issues. Please note that it is still under development and should not be relied upon for critical tasks. Any feedback you can provide will be valuable in improving this feature for future releases. Thank you for being so understanding.
This guide walks you through integrating Azure with your Enterprise Hub, allowing you to display usage analytics for the API(s) on Azure in Studio and the Developer Dashboard.
Anonymous logs
By default, logs sent are anonymous. This means that the API consumer that made the API request is not identified.
However, the suggested integration will send API logs from Azure to Rapid, including the API ID and APP ID (consumer). This can be solved by programmatically retrieving the API ID and APP IDD and adding policy logic to each individual API within Azure API Management.
Configuration
There are two main parts to this configuration:
- Create an API Project that does not use the RapidAPI Proxy and has a base URL pointing to Azure (skip if you already have this).
- Forward access logs from Azure to the Platform Analytics API.
Create an API Project that has a base URL pointing to Azure
The Platform Analytics API supports using the base URL as an API identifier (instead of the API ID). However, for this to work, the base URL on the API project listing must match the one being passed in from the gateway.
You can enable external API Gateways using the Admin Panel. For this setup to work, the base URL you add to the API must contain the entire request URL except for the resource path.
Example
Depending on your setup, your API request URL might look something like this:
https://gateway.azure-api.net/myapi/hello
Azure uses the following structure:
http://{api-managment-service-name}.azure-api.net/{base-path}/{resource-path}
Using the above example, that would mean that:
Base Path = "/myapi"
Resource Path = "/hello"
Given that, the only part you want to include in the base URL field in Studio is in bold:
https:|//gateway.azure-api.net/myapi/hello
Your gateway code template Request URL field for APIs using Azure API Management should concatenate the Base URL and the path:
Request URL: "{{API_BASE_URL}}{{PATH}}"
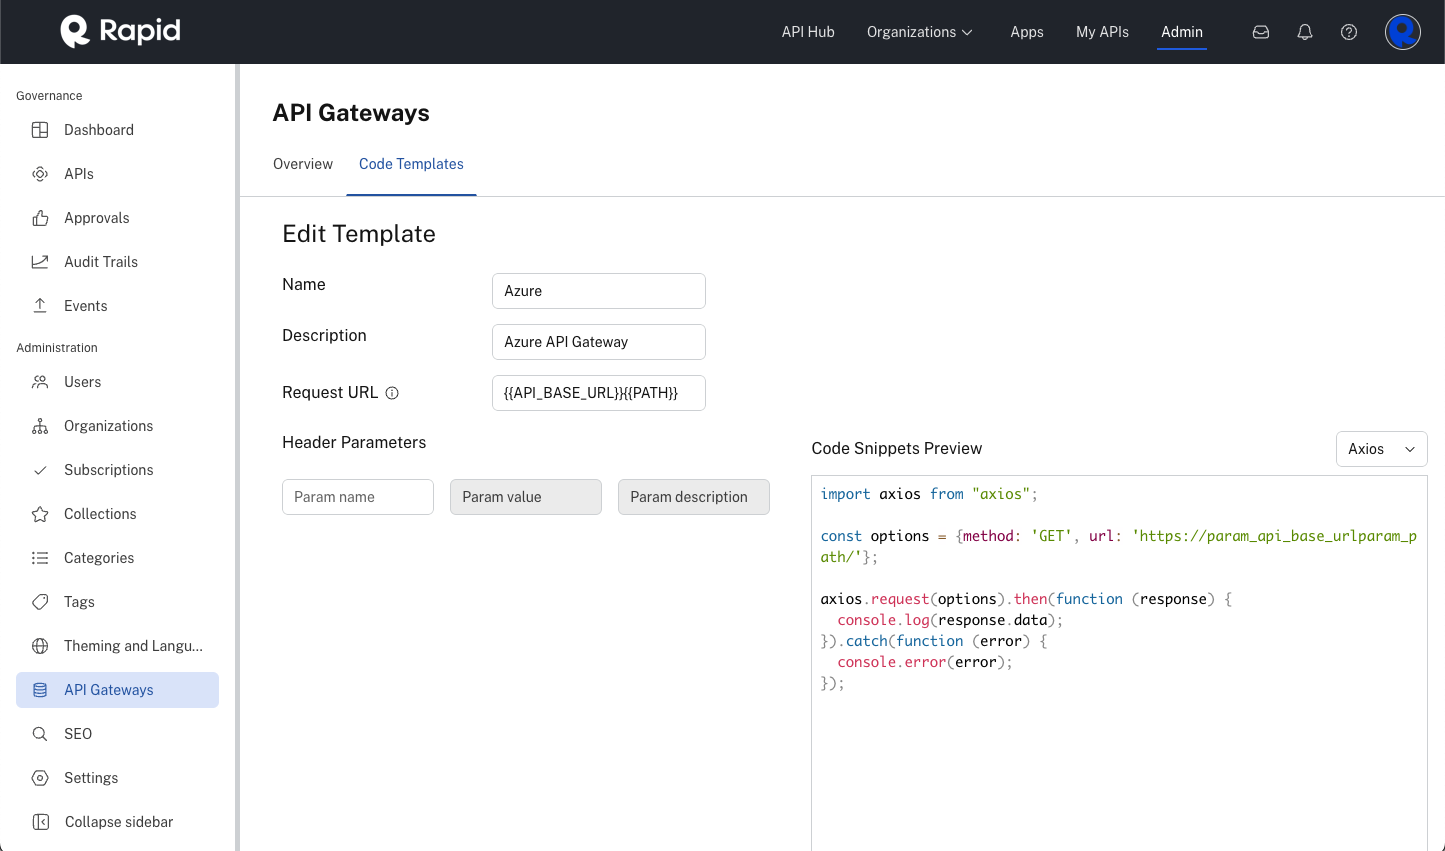
Configuring a code template to be used with Azure API Management.
Warning
Your setup might differ slightly if you have a custom DNS. Please contact support if you need help with how to proceed.
Forward logs (Azure setup)
This section will walk you through how to forward logs from Azure API Management to the Platform Analytics API.
We will need to configure policies within Azure API Management in two places:
- Policy for All APIs will send logs to the Platform Analytics API.
- Policy for each API that will set the API ID and the APP ID.
1. Configuring All APIs
Configure the API Management Policy for all APIs to send one-way requests in the outbound processing.
We will use Azure’s Send one-way request policy to send logs to the Platform Analytics API. The first thing to do is to select the policy for All APIs. The Send one-way request policy will execute with each API call, transform the metadata into the proper format, and call the Platform Analytics API.
- Click APIs in the left menu within the Azure API Management service.
- Select All APIs to show the policy.
- Select the base policy and configure the Outbound processing policy to send a one-way request to the Analytics Platform API.
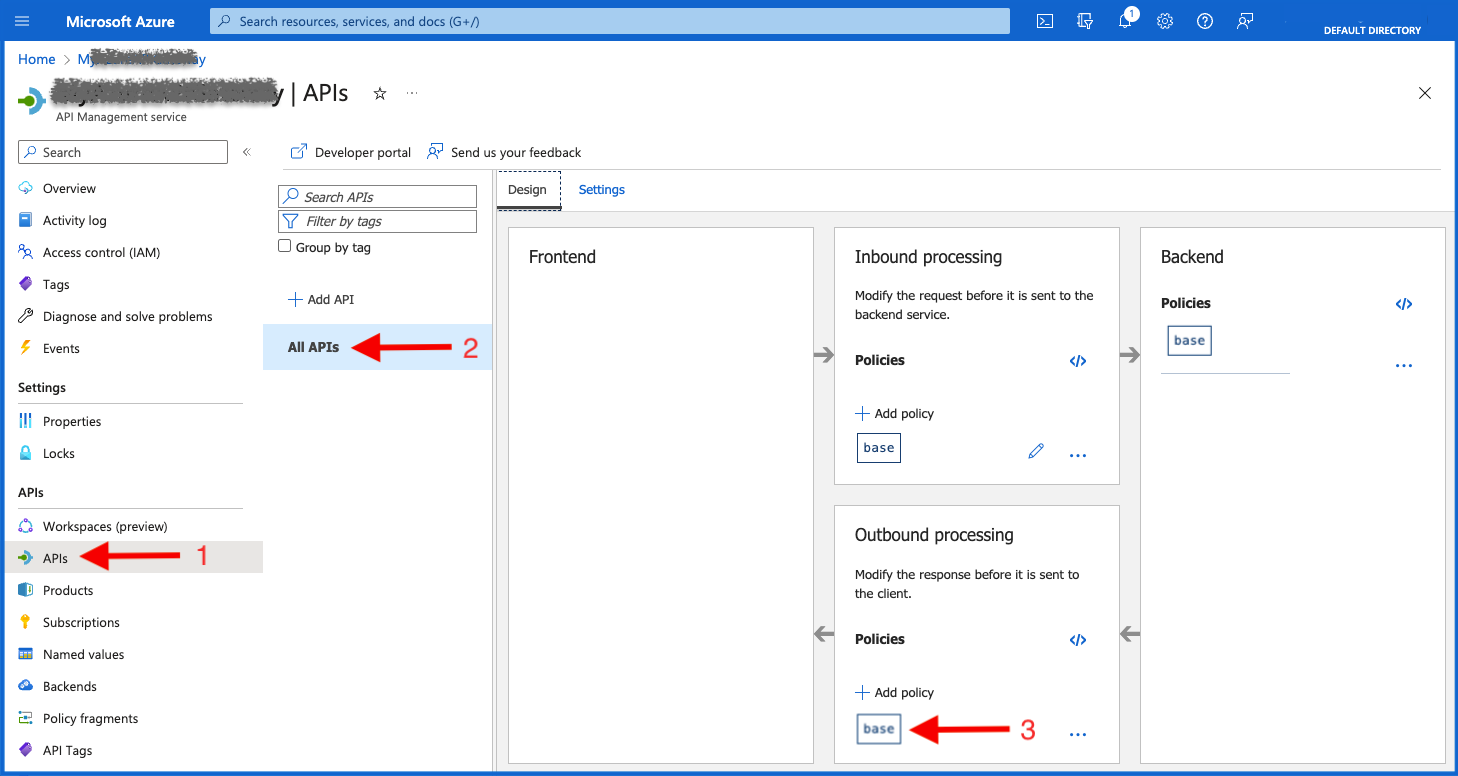
Configuring the All APIs Outbound processing policy in the Azure APIM service.
- Add the following send one-way request policy snippet to the All APIs Outbound processing policy.
<outbound>
        <send-one-way-request mode="new" timeout="10000">
            <set-url>**Platform Analytics URL**</set-url>
            <set-method>POST</set-method>
            <set-header name="X-RapidAPI-Key" exists-action="override">
                <value>**X-RapidAPI-Key**</value>
            </set-header>
            <set-header name="X-RapidAPI-Host" exists-action="override">
                <value>**X-RapidAPI-Host**</value>
            </set-header>
            <set-body>@{
            var appIdNumber = Convert.ToInt32(context.Variables["appId"]);
            var apiId = context.Variables["apiId"];
                        JArray jarrayObj = new JArray();
                            JObject obj = new JObject(
                                new JProperty("apiId", apiId),
                                new JProperty("appId", appIdNumber),
                                new JProperty("endpoint", context.Request.Url.Path + context.Request.Url.QueryString),
                                new JProperty("method", context.Request.Method),
                                new JProperty("status", context.Response.StatusCode),
                                new JProperty("apiLatency", context.Elapsed.Milliseconds),
                                new JProperty("timestamp", new DateTimeOffset(DateTime.UtcNow).ToUnixTimeSeconds()),
                                new JProperty("originIp", context.Request.IpAddress)
                                );
                            jarrayObj.Add(obj);
                        return jarrayObj.ToString();
                    }</set-body>
        </send-one-way-request>
</outbound>
- Replace the following values:
-
The Platform Analytics URL (This can be located by searching for "Analytics Platform" in your hub and viewing it in the playground).
💡 For example: platform-analytics.{{YOUR_TENANT_NAME}}.rapidapi.com
-
The X-RapidAPI-Key (This can be located by searching for "Analytics Platform" in your hub and viewing it in the playground).
💡 The X-RapidAPI-Key is a header that is used to authenticate requests to Rapid APIs. It is a unique identifier that is generated for each RapidAPI app. When you make a request to a Rapid API, you must include the X-RapidAPI-Key header in the request header. The value of the X-RapidAPI-Key header is your app key.
-
The X-RapidAPI-Host (This can be located by searching for "Analytics Platform" in your hub and viewing it in the playground).
💡 You can find the X-RapidAPI-Host and X-RapidAPI-Key headers in the documentation for the API you are trying to access. You can also find these headers in the code snippet that Rapid generates for you.
The All APIs Outbound processing will now show the Send one-way request policy.
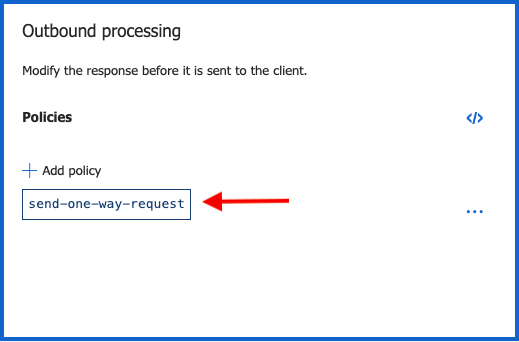
The All APIs Outbound processing policy is configured in the Azure APIM service.
2. Configuring each Azure API
Configure the API Management Policy for Each Individual API to Set the API ID and APP ID.
We will use a Azure’s Inbound policy for All operations to set the API ID and the APP ID.
- Within Azure API Management service, click on the specific API in the left hand menu. In this case, Echo API.
- Select All operations to show the Policy.
- Select the base policy to configure the Inbound processing.
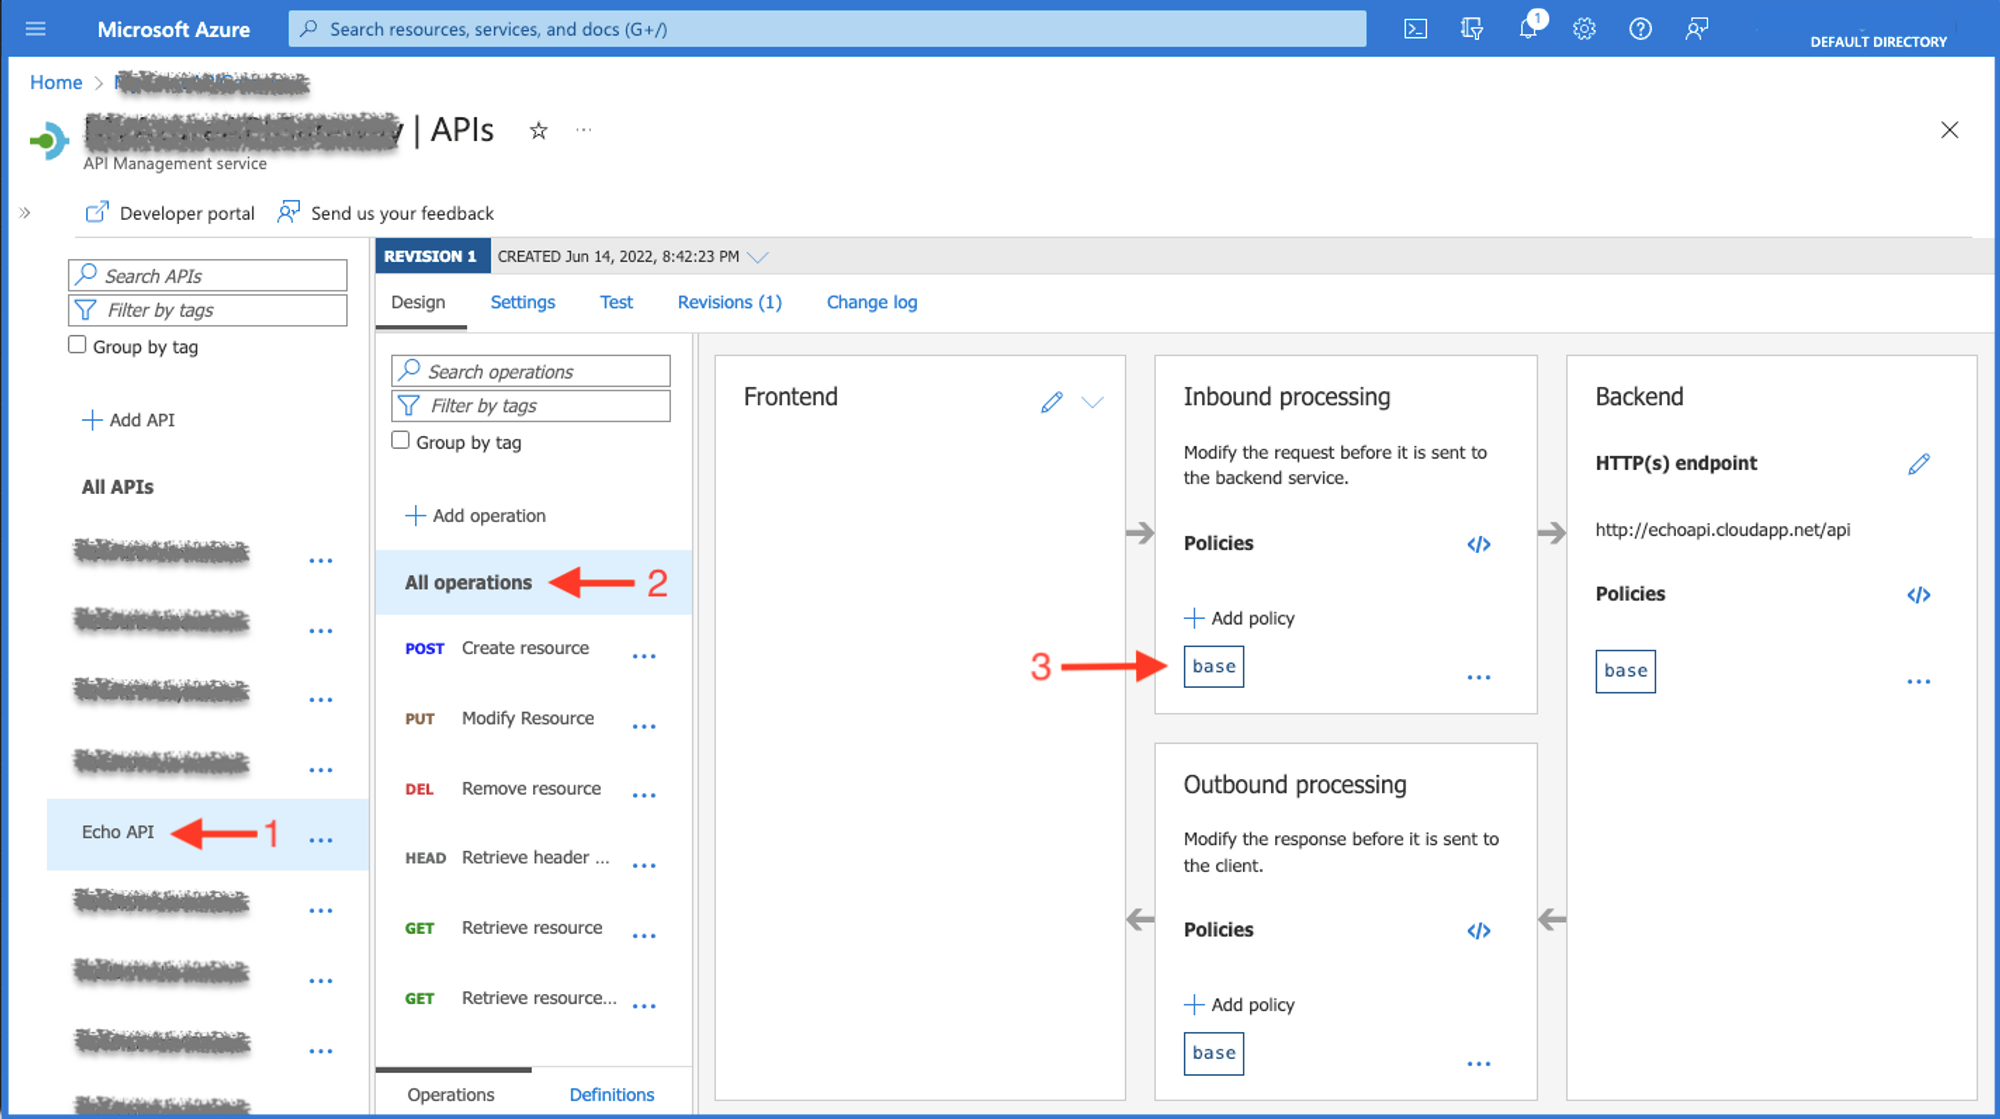
Configuring the All operations Outbound processing policy in the Azure APIM service.
- Add the following send one way request policy snippet to the Outbound processing
<policies>
    <inbound>
        <base />
        <set-variable name="apiId" value="**API ID**" />
        <set-variable name="appId" value="**APP ID**" />
    </inbound>
    <backend>
        <base />
    </backend>
    <outbound>
        <base />
    </outbound>
    <on-error>
        <base />
    </on-error>
</policies>
- Replace the following values:
- The API ID (The API ID for which you want to send analytics. The ID is part of the URL of the API listing in Studio. Alternatively, you can use the Platform API to obtain API IDs.).
- The APP ID (The APP ID can be found in the Developer Dashboard (My Apps) when expanding an app listing (right under the name), or obtained through the Platform API. If not specified, the consumer will be resolved to "Anonymous".).
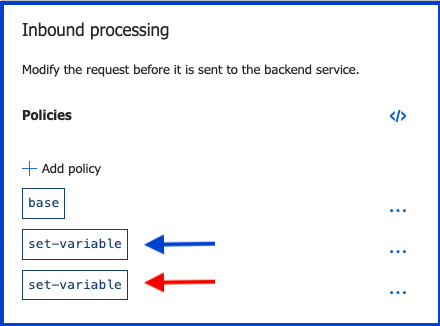
The Inbound processing will now show the two set-variable actions.
The All operations Outbound processing policy is configured in the Azure APIM service.
The All operations Outbound processing policy is configured in the Azure APIM service
💡 OPTIONAL
You can configure the policy to expect the APP ID from the call from Rapid API. You will need to add an Request Header to the Request for each endpoint within your API Project.
Here are the steps:
-
Modify the Inbound processing policy to check for the Header “appId” and set the value of the variable “appId”.
<inbound>
    <base />
    <set-variable name="apiId" value="**API ID**" />
    <check-header name="appId" failed-check-httpcode="403" failed-check-error-message="RapidAPI Application ID header required" ignore-case="true" />
    <set-variable name="appId" value="@(context.Request.Headers.GetValueOrDefault("appId"))" />
</inbound>
💡 The Inbound processing policy will look like the image below:
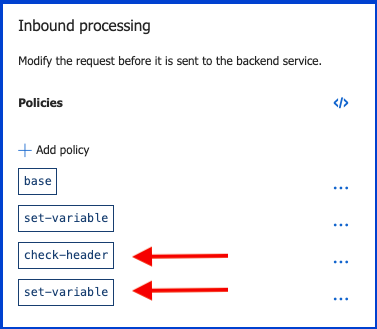
The All operations processing policy is configured in the Azure APIM service.
- Modify your Rapid API Project to include the Request Header appId and provide your APP ID in the Example Value field. More information on setting a Request Headers here.

Adding an HTTP Header Parameter in an API Project endpoint.
💡 The appId Request Header Parameter value can be overwritten in the playground before you send the request and also exported within your code snippet you’ll use to call the API on Azure from your source-code editor or application of choice.
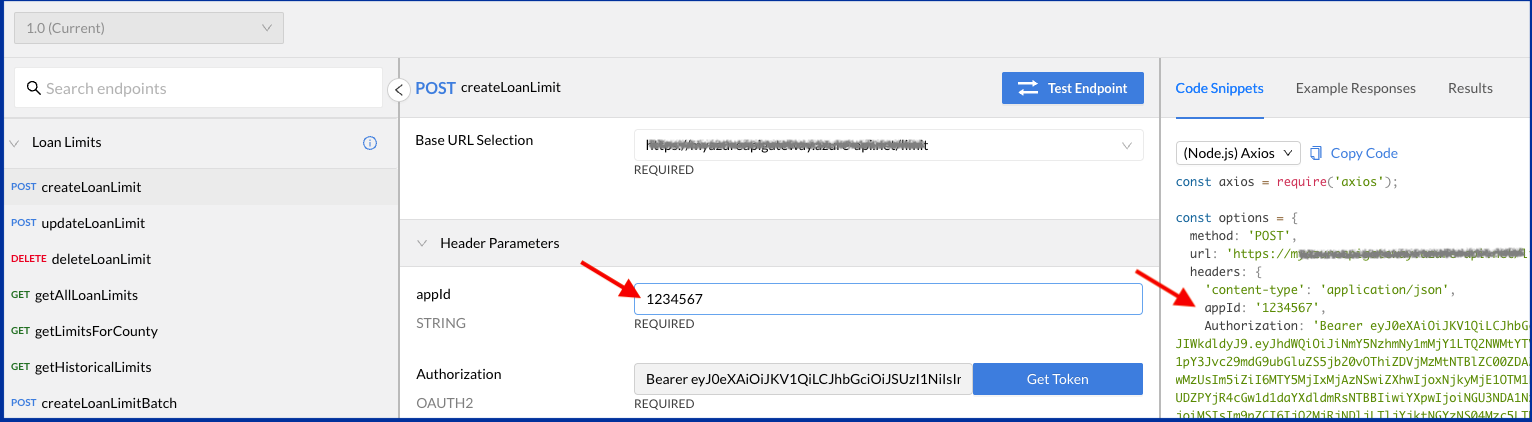
The Rapid API Playground (client) for testing APIs and downloading source-code.
Finishing Up
Azure API Management is now configured to forward logs to the Platform Analytics API for each API call it receives. Test this using the following:
- Create an API call.
- Validate the call was made to the Platform Analytics API (Open the Apps dashboard, select analytics on the App you used and view the logs).
- Validate the log is available on your API in Studio (Open the API Project that matches your API ID and navigate to the Analytics tab on the left hand side of Studio to view the logs).
- Validate the log is available on the consumer application in the Developer Dashboard (Open the App that matches your APP ID and navigate to the Analytics tab under your App to view the logs).
Updated almost 3 years ago