Login Options
Environment Admins have the ability to configure login options available to users of the Hub. If multiple login options are configured, users are presented a choice of login options (see example below).

To configure login options, Environment Admins navigate to the Admin Panel, then Settings > Login Options. In the Hub shown below, five login methods are currently enabled. To add a login method, click Add a Login Method.
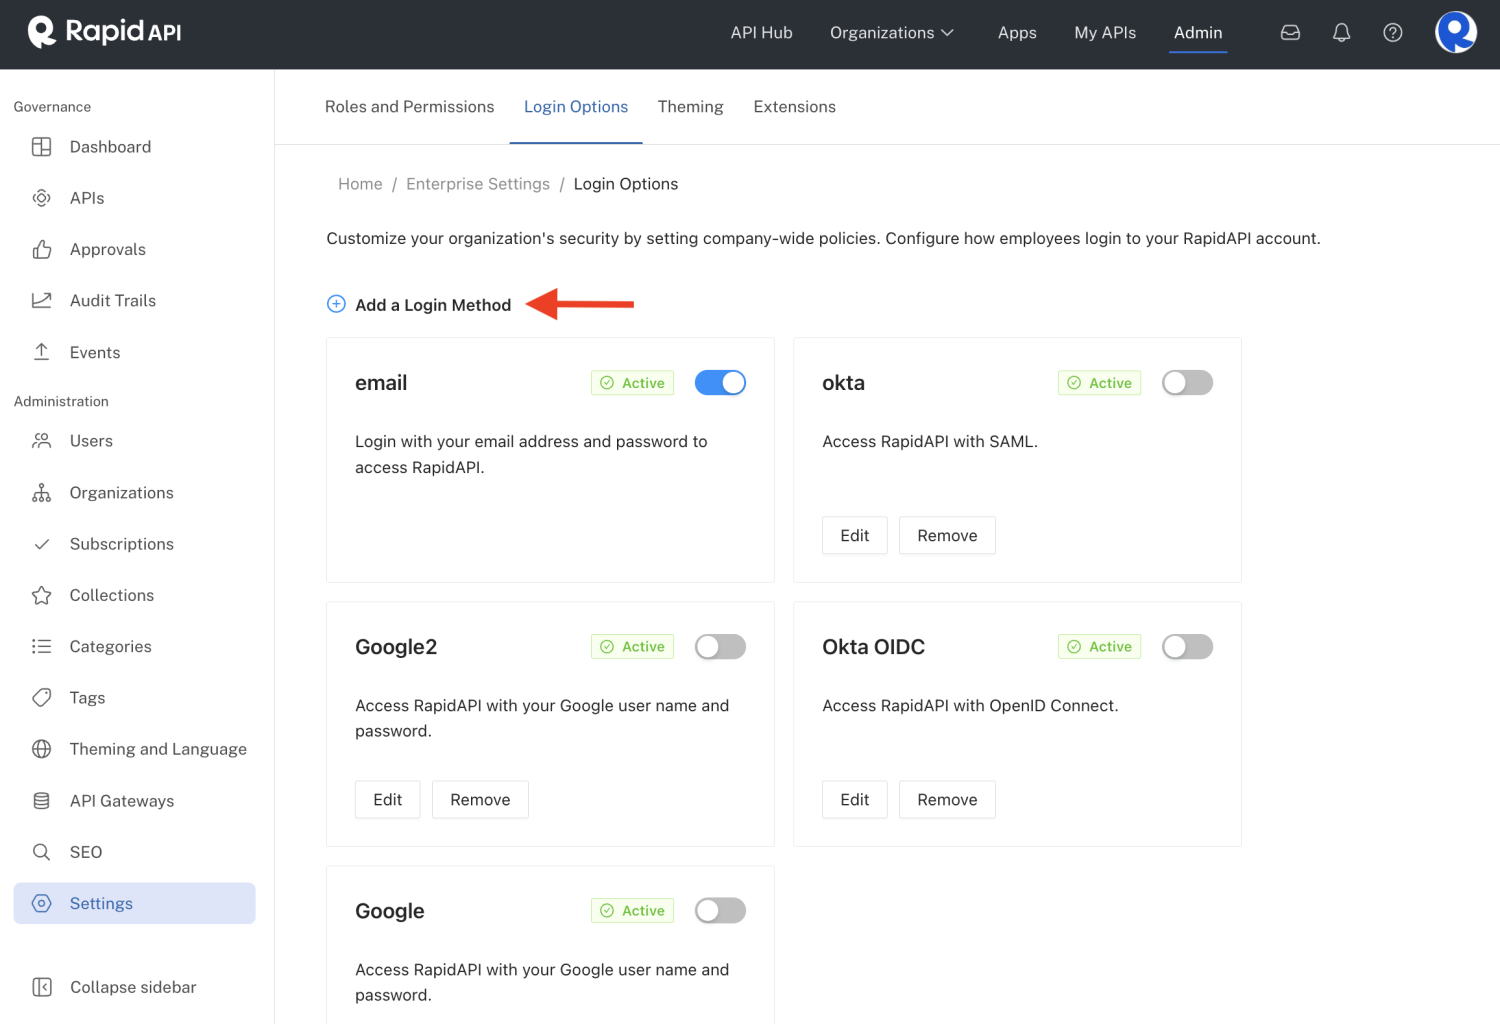
Adding a login method.
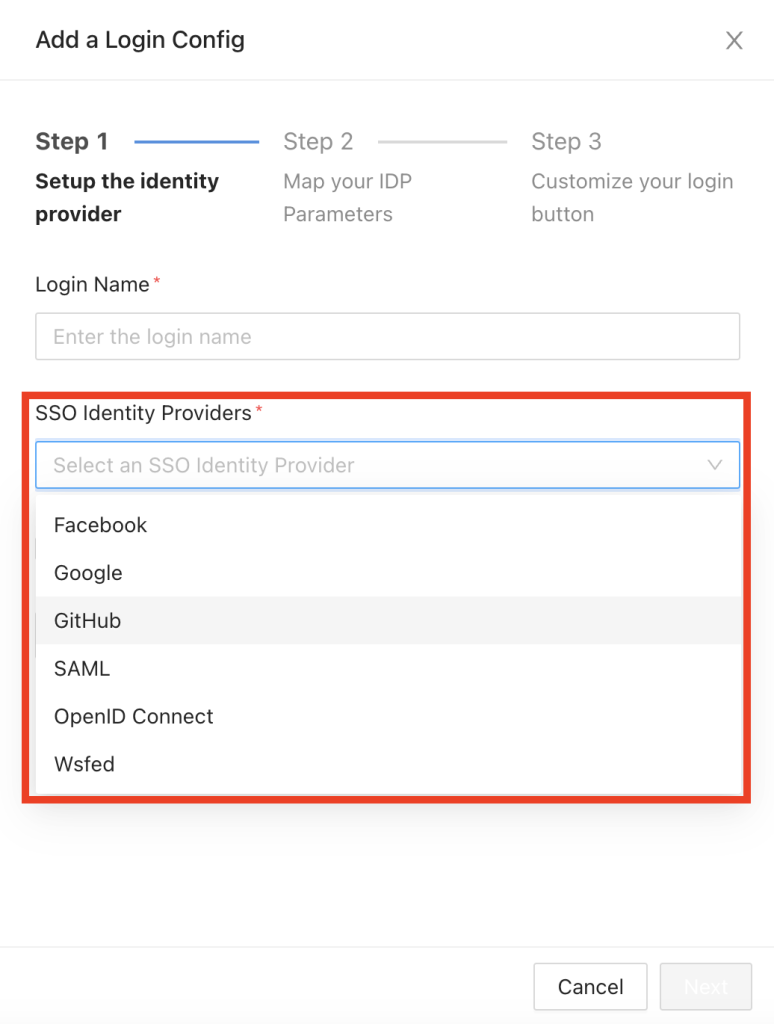
You are then presented with the Add a Login Config dialog. The following login options are available as SSO Identity Providers:
- GitHub
- SAML
- OpenID Connect
- Wsfed
With the exception of the email and password login method, all of the methods described here are used by enterprises to achieve single sign-on (SSO) for their users. Authentication is delegated by Rapid to an Identity Provider (IDP), such as Google, Okta, or Microsoft Azure Active Directory.
Once you have configured an SSO login method, it will be shown on the login page for your Hub, as shown in the first screenshot above. You also have the option to host a login button on your own HTML pages. See Hosting your own login button for more information.
Email and password
With this login method, users log in with an email address and a password. The password is managed by Rapid. A downside of this approach from the user's perspective is that the user needs to manage a unique password for logging in. A downside to this approach from an enterprise's perspective is that it bypasses the Identity Provider commonly used in the enterprise to centralize user management.
This login method is available by default. It can be disabled for a Hub using the slider on the Login Option page (see the first screenshot above).
Login with Facebook, Google, or GitHub
With these login methods, password management and authentication has been delegated to Facebook, Google, or GitHub. An advantage to this approach is that the user doesn't need to use a unique password when accessing the Hub. Also, from the enterprise's perspective, user management is more centrally managed.
To configure this type of login, you must first set up a trust relationship by obtaining a Client ID and Client Secret from the provider. You also give the provider a Redirect URL so that a valid login token can be sent from the provider (such as Google) to the Hub.
To set up login with Facebook, Google, or GitHub:
-
Obtain a Client ID and Client Secret from the provider. See the provider's documentation for instructions on obtaining this information.
-
In the Admin Panel, select Settings click Login Options.
-
Click Add a Login Method.
-
In step 1 of the Add a Login Config dialog:
-
Enter a Login Name such as "Google".
-
For SSO Identity Providers, select Facebook, Google, or GitHub.
-
Enter the Client ID and Client Secret from your provider.
-
Copy the Redirect URL and paste it in the appropriate Redirect URI field of the provider. This is so the provider knows where to send the login token. See the provider's documentation for instructions on where to add the redirect URL.
-
Optionally, click the Disable JIT Provisioning checkbox. If you disable JIT Provisioning, users without accounts on the Hub will see a message to contact their Administrator for access. If you leave this checkbox unchecked, accounts in the Hub will be provisioned when the user first logs in.
-
Back in the Admin Panel, click Test the connection.
-

If everything has been configured correctly, you should see a "Connection is valid." message and the Next button should be enabled (see the screenshot below).

Click Next.
-
In step 2 of the Add a Login Config dialog, you map field names from the test connection response to Response Keys in RapidAPI. This is a one-time process so that RapidAPI correctly reads the information provided from the provider. The information that you will see depends on how you configured your provider.
- In the example below, we see that there are two required Response Keys, "User Name" and "Email". From the Response section (automatically filled in by RapidAPI), you can see that the "name" field of the "_json" object is used to identify the user name. Therefore, we have entered "_json.name" for the User Name Response Key (as shown below). Similarly, for Email we have entered "_json.email". As a sanity check, you see the sample Response Values from your test connection. You do not need to modify the Response Values. Click Next when you are finished adding the Response Keys.

- In step 3 of the Add a Login Config dialog, select the button that you would like users to see when they log in, then click Save. You should now see the new sign in button when logging into the Hub.

SAML
SAML is a protocol used by Identity Providers to communicate user authentication and authorization information with third-party service providers such as the Rapid Hub. Using SAML, the Hub delegates user authentication to the Identity Provider.
SAML vs. OpenID Connect
SAML and OpenID Connect are two protocols for communicating user identity and authentication information. Your Identity Provider may support one or both of these protocols. Since OpenID Connect is newer and built on top of OAuth 2.0, it is the recommended protocol in most circumstances.
Wsfed support
In addition to SAML, Rapid offers support for WS-Federation. With this login method, you have ability add a unique entityId for each of your applications. See Wsfed.
To configure SAML in the Hub, you must first set up a trust relationship by obtaining IDP metadata from your Identity Provider. You also give the provider a Single Sign On URL so that authentication-related information can be sent from the provider to the Hub.
If your enterprise uses an Identity Provider that uses the SAML protocol, you configure that Identity Provider using the following steps:
-
Obtain "Identity Provider Metadata" from the Provider. See the Provider's documentation for instructions on obtaining this information.
-
In the Admin Panel, click Settings in the sidebar and then click Login Options.
-
Click Add a Login Method.
-
In step 1 of the Add a Login Config dialog:
-
Enter a Login Name such as "Okta".
-
For SSO Identity Providers, select SAML.
-
Copy the Single Sign On URL and paste it in the appropriate field of the provider. This is so the provider knows where to send the authentication information. See the provider's documentation for instructions on where to add this URL.
-
For Issuer, enter the unique URL provided by your Identity Provider (it may be named something like "Identity Provider Issuer").
-
For Identity Provider Meta Data, paste the IDP metadata from your Identity Provider.
-
Optionally, click the Disable JIT Provisioning checkbox. If you disable JIT Provisioning, users without accounts on the Hub will see a message to contact their Administrator for access. If you leave this checkbox unchecked, accounts in the Hub will be provisioned when the user first logs in.
-
Click Test the connection (you may need to scroll down in the dialog to see it). If everything has been configured correctly, you should see a "Connection is valid." message and the Next button should be enabled (see the screenshot below).
-
Click Next.
-


-
In step 2 of the Add a Login Config dialog, you map field names from the test connection response to Response Keys in RapidAPI. This is a one-time process so that RapidAPI correctly reads the information provided from the Identity Provider. The information that you will see depends on how you configured your Identity Provider.
- In the example below, we see that there are two required Response Keys: "User Name" and "Email". From the Response section (automatically filled in by RapidAPI), you can see that the nameID field is used to identify the user. Since our Identity Provider has been configured to login using email addresses, you would enter nameID for both the "User Name" and "Email" Response Keys (as shown below). As a sanity check, you also see sample Response Values from your test connection. You do not need to modify the Response Values. Click Next when you are finished adding the Response Keys.

- In step 3 of the Add a Login Config dialog, enter the button name, such as "Sign in with Okta". Select the button's background and text colors. Upload the button's icon/image and click Save You should now see the new sign in button when logging into the Hub.

- Attempt to log in to the Hub using the new login method. If you are having problems with this setup, please contact our support team by emailing https://support.rapidapi.com/.
OpenID Connect
OpenID Connect is an identity layer on top of OAuth 2.0. Like SAML, it is a protocol used to connect an Identity Provider such as Okta with a service provider such as RapidAPI. The Hub uses the OpenID Connect protocol to delegate user authentication to your Identity Provider.
To configure OpenID Connect in the Hub, you must first set up a trust relationship by obtaining information from your Identity Provider. You also give the provider a Redirect URL so that authentication-related information can be sent from the provider to the Hub.
If your enterprise uses an Identity Provider that uses the OpenID Connect protocol, you configure that Identity Provider using the following steps:
-
Obtain Client ID, Client Secret, and Discovery Endpoint from the provider. See the provider's documentation for instructions on obtaining this information.
-
In the Admin Panel, click Settings in the sidebar and click Login Options.
-
Click Add a Login Method.
-
In step 1 of the Add a Login Config dialog:
-
Enter a Login Name such as "Okta".
-
For Login Type, select OpenID Connect.
-
Paste the information obtained from your provider.
-
Copy the Redirect URL and paste it in the appropriate field of the Identity Provider. This is so the Identity Provider knows where to send the authentication information. See the Identify Provider's documentation for instructions on where to add this URL.
-
Optionally, click the Disable JIT Provisioning checkbox. If you disable JIT Provisioning, users without accounts on the Hub will see a message to contact their Administrator for access. If you leave this checkbox unchecked, accounts in the Hub will be provisioned when the user first logs in.
-

Click Test the connection (you may need to scroll down in the dialog to see it). If everything has been configured correctly, you should see a "Connection is valid." message and the Next button should be enabled (see the screenshot below).

Click Next.
-
In step 2 of the Add a Login Config dialog, you map field names from the test connection response to Response Keys in RapidAPI. This is a one-time process so that RapidAPI correctly reads the information provided from the Identity Provider. The information that you will see depends on how you configured your Identity Provider.
- In the example below, we see that there are two required Response Keys: "User Name" and "Email". From the Response section (automatically filled in by RapidAPI), you can see that the preferred_username field is used to identify the user name. This field name is entered as a Response Key. You also enter email for the "Email" Response Key (as shown below). As a sanity check, you also see sample Response Values from your test connection. You do not need to modify the Response Values. Click Next when you are finished adding the Response Keys.

- In step 3 of the Add a Login Config dialog, enter the button name, such as "Sign in with Okta". Select the button's background and text colors. Upload the button's icon/image and click Save. You should now see the new sign in button when logging into the Hub.

- Attempt to log in with the new login method. If you are having problems with this setup, please contact our support team at https://support.rapidapi.com/.
Troubleshooting tips
Make sure that the identifiers that you enter map to the correct instance of the Identity Provider that you want to link to Rapid.
WS-Federation
If your enterprise uses an Identity Provider that uses the WS-Federation protocol, you configure that Identity Provider using the following steps:
-
Obtain "Identity Provider Metadata" from the Provider. See the Provider's documentation for instructions on obtaining this information.
-
In the Admin Panel, click Settings in the sidebar and then click Login Options.
-
Click Add a Login Method.
-
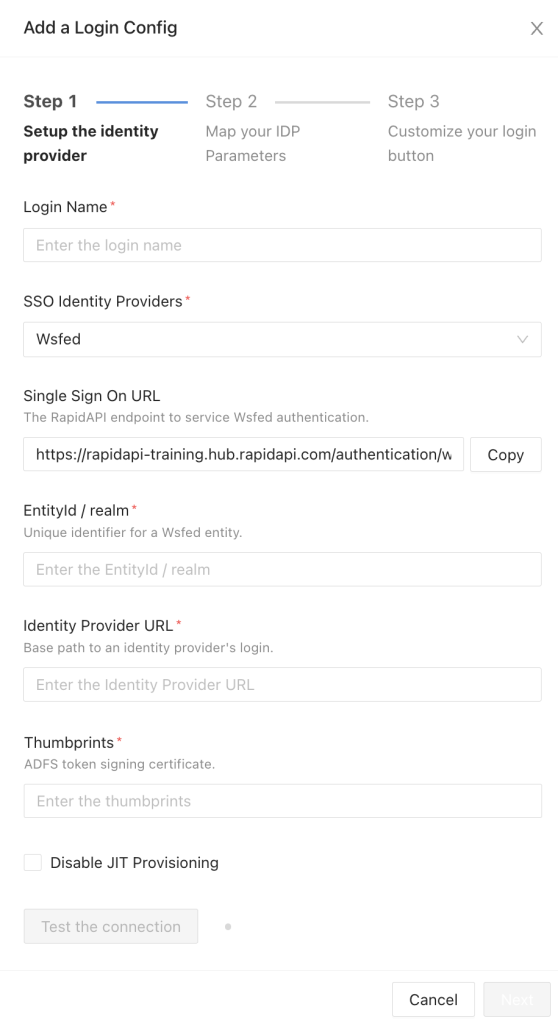
In step 1 of the Add a Login Config dialog:
-
Enter a Login Name such as "Okta".
-
For SSO Identity Providers, select Wsfed.
-
Copy the Single Sign On URL and paste it in the appropriate field of the provider. This is so the provider knows where to send the authentication information. See the provider's documentation for instructions on where to add this URL.
-
For EntityId / realm, enter the unique URL provided by your Identity Provider.
-
For Thumbprints, paste the ADFS token signing certificate from your Identity Provider.
-
Optionally, click the Disable JIT Provisioning checkbox. If you disable JIT Provisioning, users without accounts on the Hub will see a message to contact their Administrator for access. If you leave this checkbox unchecked, accounts in the Hub will be provisioned when the user first logs in.
-
Click Test the connection (you may need to scroll down in the dialog to see it). If everything has been configured correctly, you should see a "Connection is valid." message and the Next button should be enabled (see the screenshot below).
-
Click Next.
-
Hosting your own login button
Once you have configured an SSO login method, it will be shown on the login page for your Hub, as shown in the first screenshot above. You also have the option to host a login button on your own HTML pages.
The URL for login button on your pages should be in the following format:
https://{{hub_url}}/authentication/{{auth_type}}?authConfigurationId={{auth_config_id}}
{{hub_url}} should be replaced with the URL of your Hub.
{{auth_type}} should be replaced with one of the following values depending on your SSO method: saml, openId, google, github, facebook.
{{auth_config_id}} should be replaced with a value that can be provided to you after you have configured your SSO login method. Please contact https://support.rapidapi.com/ to obtain your auth_config_id once you have configured your SSO login method.
Updated about 3 years ago